
List Price: $54.99
Sale Price: $34.99
Today's Bonus: 36% Off

My girlfriend's family has a Weber Genesis they purchased in 1988. I was tired of the hot spot in the rear and decided to replace the burner tube set. After some research, we ordered the tubes for pre-2002 models.
The tubes arrived in official Weber packaging and fit like a glove. The Weber works like new.
The kit included shoulder bolts to replace the manifold mount bolts. Interestingly, the instructions never mentioned the bolts and give the impression the existing set are easily removed. NOT! They must be drilled out since their exposure to high heat has bonded them to the Weber housing.
After some experimentation, I found a way to remove the existing rusty tubes without drilling out the bolts on the manifold mount. Here is how:
0) follow the instructions up to the point they tell you to remove the manifold mounting bolts. DO NOT REMOVE THEM. They will break and have to be drilled out.
1) slide all three bars as snugly as possible against their respective manifold valves.
2) while pressuring downward on the manifold assembly near the valves [NOTE: do not bend the mount...just pressure it] lift the crossover bar up so all three tubes deflect upwards and pull them away form their manifold mounts. I found it easiest to remove the center bar first, then pulled the rear tube up and released it from the cross tube. Whenever you need to release a tube from its manifold valve, pressure downward on the manifold assembly and maneuver the other end of the tube.
3) as you slide out the tubes, rotate them 90 degrees so their flat ends fit through the slotted holes on the side of the Weber housing. [NOTE: much easier to do without the tank and tank mount in the way]
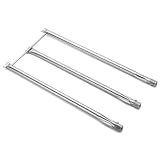
4) slide new tubes into place and attach cross tube [NOTE: front tube, rear tube, and cross tube vent holes should face inward and the cross tube tab should be facing downward--center tube vent holes should face upward].
5) pressure downward on manifold assembly and attach middle tube.
6) pressure downward on manifold assembly and attach front tube.
7) while pulling up on cross tube, maneuver the center tube into to tab. It takes some angling and rotation.
8) pressure downward on manifold assembly and attach rear tube. [NOTE: reattach tank mount and tank if they were removed]
Now follow remaining instructions to reassemble and test.
Click Here For Most Helpful Customer Reviews >>
Nothing lasts forever, not even stainless steel. I put these burners on my 10 year-old Weber Genesis 1000 and the thing runs like brand new again. They were a cinch to install once I got the right ones. The first set I received had 3 identical burners (the middle one is supposed to be 1/2 inch shorter). Once Amazon resent the correct set, instant-prestothe grill cooks like new!. Worth every cent.Best Deals for Weber 7506 Stainless Steel 3 Burner Tube Set
I searched all the home center stores before realizing that while they sell Weber products, they don't support Weber products. So here's a couple of tips.Weber guarantees their burners for ten years, you should have registered your product, but with the serial number they'll honor the guarantee anyway. Just be aware though, the serial number is printed on your grill frame and not etched, so with time and weather it fades so that you can't read it this happens well before the ten year period. So write it down some where and store it.
WHen you go to change this burner out buy a good quality grease remover and spray it generously all over the inside of the grill, brush it and then rinse with hot water. It'll keep you clean and make the change out process easier, faster and more fun.
Once you're done, realize your newly refurbished grill will burn hotter, cook faster and save you propane costs. You'll still have the same hot spots mine is th upper right hand corner, but your food will look and taste better.
So glad I did this instead of purchasing a new Weber which is what I was considering doing.
Honest reviews on Weber 7506 Stainless Steel 3 Burner Tube Set
I have a 17 year old Weber that had hot and cold areas around the grill. I noticed that some flames were blue with orange tips, and others were all orange.I replaced the original Burner Tubes with the new set and what a difference. The first thing I noticed was all blue flame, and I could feel the heat from the flames. I've cooked steak and fish and have noticed better grill marks, and even cooking.
Weber suggests you change these tubes every 10 years so 17 years was really pushing it.
Two thumbs up!!!
Find helpful customer reviews and review ratings for Weber 7506 Stainless Steel 3 Burner Tube Set
Very easy to remove old burners and replace with new. The only hassle was cleaning the crap I let accumulate over the years. The new burners make a remarkable deference in my grills performance.
No comments:
Post a Comment